This tutorial will guide you in setting up Service Discovery using Netflix Eureka in Spring Microservices. We will start by understanding what is service discovery and then we will explore Netflix Eureka Server and Client setup, and finally the configuration in a sample Spring microservice project.
Service Discovery using Eureka in Spring Microservices
What is Netflix Eureka used for?
Suppose there's a small town where 10 families live in their houses and initially they all gave each other their addresses. Everything was fine, if family-1 wanted to go to family-2's house, they would look into their own diary where they have noted down all the families' addresses, and then go there. But after a few days, family-2 changed their house. Now when other families went to family-2's house, there was no one because they have moved to somewhere else. Now, family-2 needs to tell all the other families their new address. You can see here how difficult this situation is (We can think of all these families as microservices).
To find a solution to this problem, all the families together hired a full-time man named Eureka, gave him a room where he would sit all day with a diary to keep an updated list of addresses so that NO family has to maintain their personal diary of addresses. All the families will go to Eureka and will register their respective addresses in his diary. So whenever one family needs to visit another family's house, it will ask that family's address from Eureka by providing that family's name and then will go there. Also, if any family changes their address, they just need to update their address to Eureka only unlike before where they have to tell everyone their new address. This is the need and working of Eureka explained in a short story :)

What is Service discovery?
Service Discovery is how microservices discover each other over a network. There are two main components of it in terms of Eureka service:
-
Eureka server (service registry): It is a server that stores the addresses (host and ports) of all the registered microservices.
-
Eureka Client: It's a microservice registered on the central server and it updates and retrieves addresses to/from the central Eureka server.
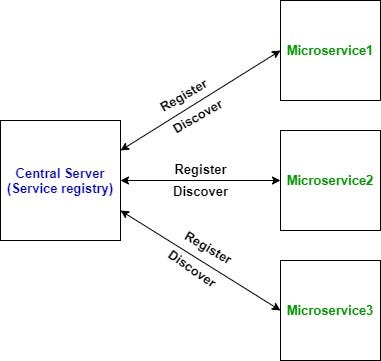
Eureka provides service discovery in a microservices architecture. This involves two steps on a high level:
-
Services register themselves on the Eureka server and details like name, host, and port are stored there.
-
Details of other registered microservices become available for the registered service.
Let's cover how we can set up the Eureka Server and Eureka Client in a microservice architecture.
Eureka Server Setup
Let us implement our Eureka Server. Go to Spring Initializer and create a new spring boot application with the name eureka by clicking on Generate. A zip file will be downloaded, extract it. Then open your spring tool suite (STS) and click on File > Import > Maven > Existing Maven Project > Browse and open the project you extracted.
1. Add Required dependencies:
We can see that we have added a dependency for spring-cloud-dependencies in dependency management. What is its purpose? And we haven't specified the version of the eureka-server dependency under dependencies. So, what we have done here? We have globally defined the version of spring-cloud dependencies under dependency management so that we don't have to explicitly specify the version for spring-cloud dependencies everywhere.
<dependencyManagement>
      <dependencies>
            <dependency>
                 <groupId>org.springframework.cloud</groupId>
                 <artifactId>spring-cloud-dependencies</artifactId>
                 <version>Hoxton.SR3</version>
                 <type>pom</type>
                 <scope>import</scope>
            </dependency>
      </dependencies>
</dependencyManagement>
<dependencies>
       <dependency>
             <groupId>org.springframework.cloud</groupId>
             <artifactId>spring-cloud-starter-netflix-eureka-server</artifactId>
       </dependency>
</dependencies>
2. Add @EnableEurekaServer on main Application class (EurekaApplication):
The @EnableEurekaServer annotation activates Eureka Server-related configuration. It enables the service registry and makes our spring boot application act as a Eureka Server.
import org.springframework.boot.SpringApplication;
import org.springframework.boot.autoconfigure.SpringBootApplication;
import org.springframework.cloud.netflix.eureka.server.EnableEurekaServer;

@SpringBootApplication
@EnableEurekaServer
public class EurekaApplication {
     public static void main(String[] args)
     {
           SpringApplication.run(EurekaApplication.class, args);
     }
}
3. Add properties in application.properties file:
Now we will add the eureka-related properties to our project's application.properties file.
spring.application.name = Eureka
server.port = 5555
eureka.client.fetch-registry = false
eureka.client.register-with-eureka = false
eureka.client.service-url.defaultZone = http://localhost:5555/eureka
In the above properties file:
-
Firstly we have specified the application name as Eureka.
-
Then we have specified the port on which the Eureka server will run. By default, it is 8761.
-
The Eureka server has a built-in Eureka client also. As in production, generally, there is a cluster of Eureka servers and they register among themselves as clients. But for learning purposes, we are running the server on the localhost and we don’t need a cluster. So we need to switch off the client's behavior so that it doesn't try to register itself. So the next two properties specify that.
-
At last, we have specified the service-url which is the URL of itself as there is no other server (standalone mode). If we don't specify this, the Eureka server will still run on the port specified and we will be able to access the UI at the same port but in the below screenshot of UI, the last two URLs under General info will have the default port (8761) and not 5555.
The Eureka server will have its home page with UI at http://localhost:5555/
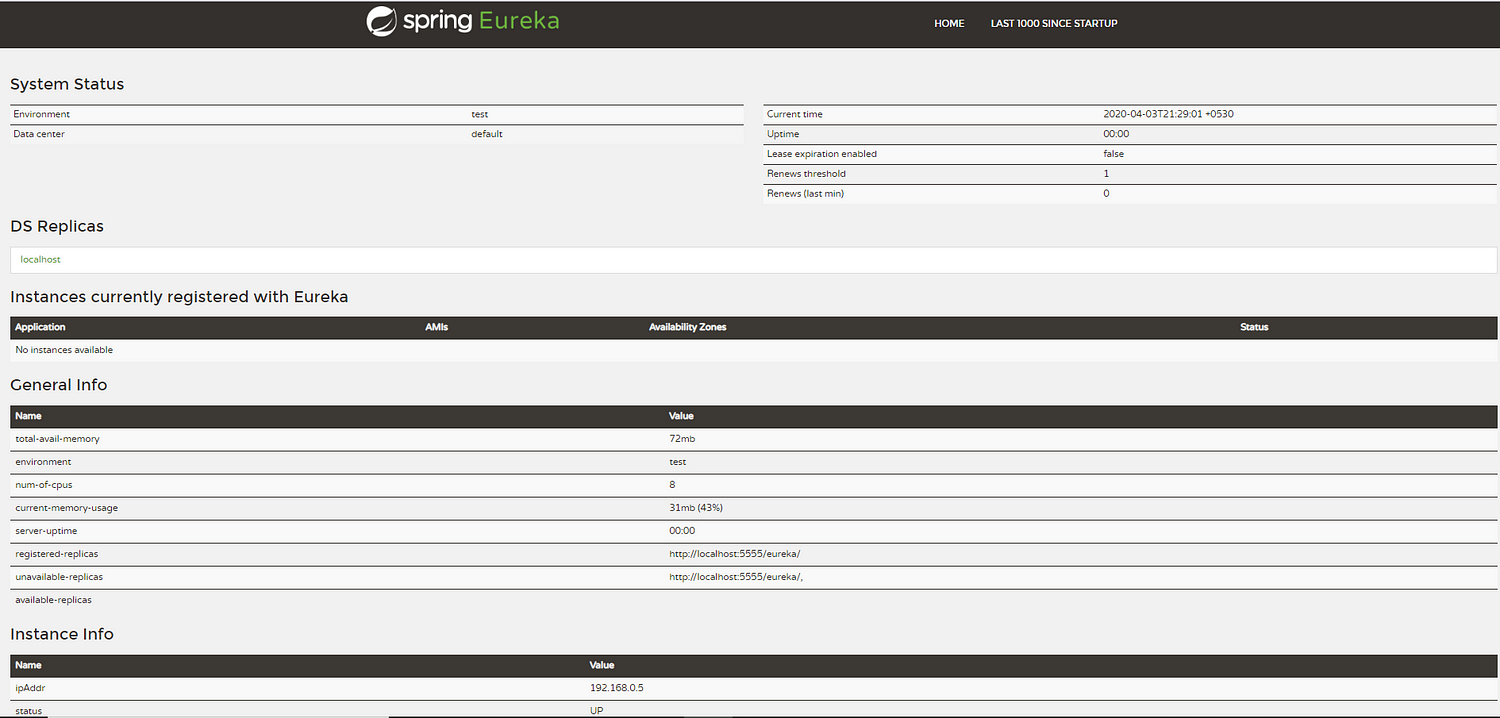
We can see the Eureka server is running and no instances are currently registered with it.
Eureka Client Setup
Let's create 2 microservices which will be our Eureka clients, "Micro1" and "Micro2" where the former calls the latter. For these two as well, go to Spring Initializer and create a new spring boot application and import them into Spring Tool Suite.
1. Add dependencies in both the microservices:
We will add the following dependencies in the two microservice.
<dependencyManagement>
      <dependencies>
            <dependency>
                 <groupId>org.springframework.cloud</groupId>
                 <artifactId>spring-cloud-dependencies</artifactId>
                 <version>Greenwich.RELEASE</version>
                 <type>pom</type>
                 <scope>import</scope>
            </dependency>
      </dependencies>
</dependencyManagement>

<dependencies>
      <dependency>
           <groupId>org.springframework.cloud</groupId>
           <artifactId>spring-cloud-starter-netflix-eureka-client</artifactId>
      </dependency>
</dependencies>
2. Add @EnableEurekaClient on main application class (Micro1Application and Micro2Application):
Up to certain versions, adding @EnableEurekaClient annotation was mandatory. But now it is optional and we can skip that if we are having the spring-cloud-starter-netflix-eureka-client dependency in our client microservices.
In order to specifically declare that, we can still specify it so that whenever someone sees our application class, they can immediately know that it is a Eureka Client.
import org.springframework.boot.SpringApplication;
import org.springframework.boot.autoconfigure.SpringBootApplication;
import org.springframework.cloud.netflix.eureka.EnableEurekaClient;

@SpringBootApplication
@EnableEurekaClient     //optional
public class Micro1Application {
      public static void main(String[] args)
      {
           SpringApplication.run(Micro1Application.class, args);
      }
}
3. Add the following properties in application.properties file:
The first property specify the name of the application. If we don’t specify it, the service will still get registered with the Eureka server but its name will be UNKNOWN.
The second property specifies the port on which the microservice will run. The last property is optional if the Eureka server is running on its default port (8761) otherwise we have to specify it.
Micro1 - application.properties:
spring.application.name = micro1
server.port = 8080
eureka.client.service-url.defaultZone = http://localhost:5555/eureka
Micro2 - application.properties:
spring.application.name = micro2
server.port = 8081
eureka.client.service-url.defaultZone = http://localhost:5555/eureka
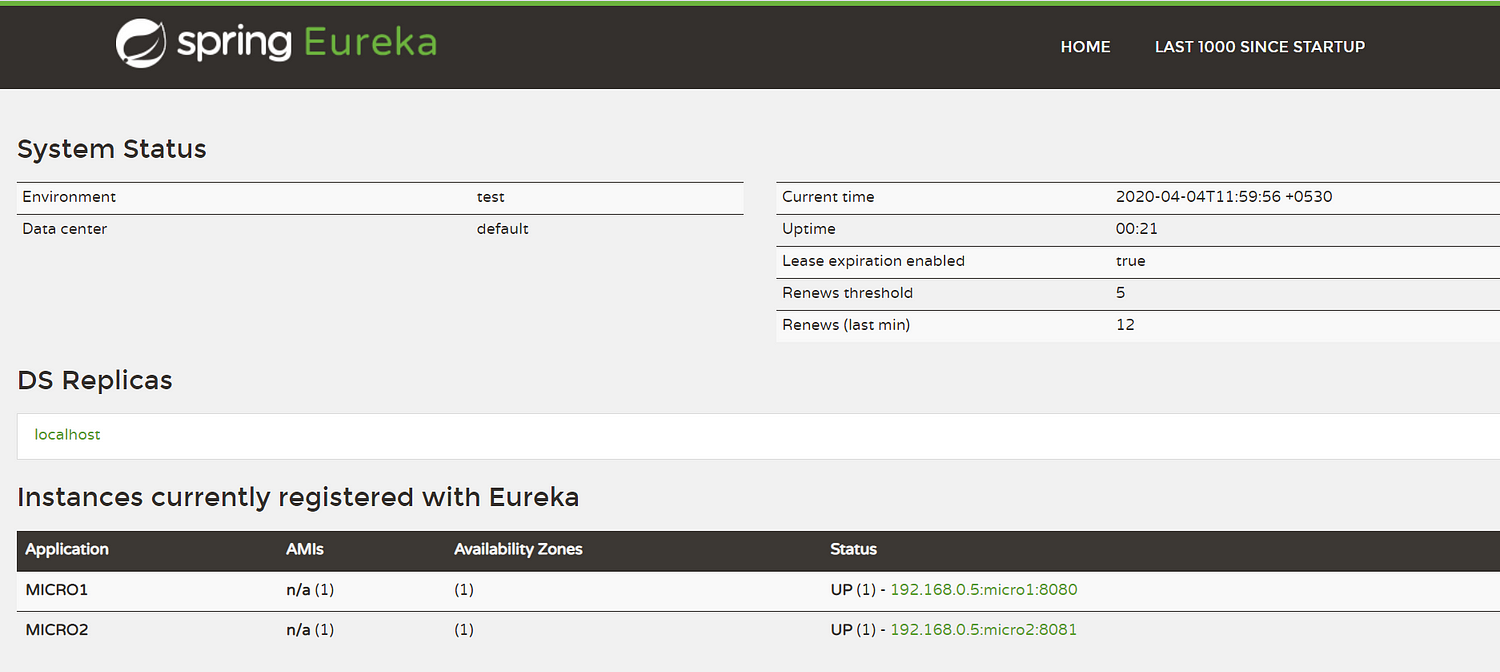
Now, when we run our two microservices, we will be able to see them registered on the Eureka server under Instances currently registered with Eureka. By default, Eureka uses the client's heartbeat to determine if a client is up.
Now, let's see our Microservice1's controller BEFORE Eureka. It is making a call to Microservice2 and appending its response to the final response. Here, we can see that we have hardcoded the URL of the Microservice2 (host and port). But in production, this may result in failure, as the address of service can change dynamically as per availability.
import org.springframework.web.bind.annotation.RequestMapping;
import org.springframework.web.bind.annotation.RestController;
import org.springframework.web.client.RestTemplate;

@RestController
@RequestMapping("micro1")
public class Micro1Controller {
   @RequestMapping("name")
   public String getMicroserviceName()
   {
       String micro2Response = new
   RestTemplate().postForObject("http://localhost:8081/micro2/name",
   null, String.class);
       return "micro1" + " : " + micro2Response;
   }
}
So, let's see how we can use Eureka's service discovery to remove this hardcoded URL.
4. Autowire the DiscoveryClient and use it to get the URI of other microservices:
The autowired discovery client is used to get all the instances of the service registered at Eureka server with the name Micro2. From that list of instances, we are fetching the first instance's URI and using it to make the HTTP call.
import java.net.URI;
import java.util.List;
import org.springframework.beans.factory.annotation.Autowired;
import org.springframework.cloud.client.ServiceInstance;
import org.springframework.cloud.client.discovery.DiscoveryClient;
import org.springframework.web.bind.annotation.RequestMapping;
import org.springframework.web.bind.annotation.RestController;
import org.springframework.web.client.RestTemplate;

@RestController
@RequestMapping("micro1")
public class Micro1Controller {
   @Autowired
   DiscoveryClient discoveryClient;
   @RequestMapping("name")
   public String getMicroserviceName()
   {
      List<ServiceInstance> list =
                             discoveryClient.getInstances("Micro2");
      ServiceInstance service2 = list.get(0);
      URI micro2URI = service2.getUri();
      String micro2Response = new
                       RestTemplate().postForObject(micro2URI +
                       "/micro2/name", null, String.class);
      return "micro1 : " + micro2Response;
   }
}
Setup Multiple Eureka Servers (Cluster)
We have created only one Eureka server. But what if it goes down? Microservices will not be able to communicate with each other and hence, our server becomes a single point of failure. To avoid that, in production, there's generally a cluster of Eureka servers with 2 or more servers. So let's see how to do that.
Create two Eureka servers with below application.properties:
Eureka server 1 - application.properties:
spring.application.name = Eureka
server.port = 5555
eureka.client.fetch-registry = false
eureka.client.register-with-eureka = false
eureka.client.service-url.defaultZone = http://localhost:5558/eureka
Eureka server 2 - application.properties:
spring.application.name = Eureka2
server.port = 5558
eureka.client.fetch-registry = false
eureka.client.register-with-eureka = false
eureka.client.service-url.defaultZone = http://localhost:5555/eureka
Microservice1 - application.properties:
spring.application.name = micro1
server.port = 8080
eureka.client.service-url.defaultZone = http://localhost:5555/eureka, http://localhost:5558/eureka
Microservice2 - application.properties:
spring.application.name = micro2
server.port = 8081
eureka.client.service-url.defaultZone = http://localhost:5555/eureka, http://localhost:5558/eureka
Some Important notes on Eureka:
-
An application registered with Eureka is known as Eureka instance. Every Eureka instance is also a Eureka Client as it can fetch the details of other Eureka instances also.
-
If we are using the Eureka server in standalone mode, i.e. there’s only one Eureka server then we need to set eureka.client.fetch-registry and eureka.client.register-with-eureka to false so that it doesn’t try to register itself with itself as the Eureka server also has a built-in Eureka client.
-
A service is registered with the Eureka server when the eureka.client.register-with-eureka is set to true (by default, true) and it becomes an Eureka instance. Then this instance keeps sending heartbeats to the Eureka server. If Eureka server doesn’t receive a heartbeat from any instance within a particular time limit (by default, 30 secs) then it will consider that instance as DOWN and will de-register it from the service registry.
-
A Eureka instance is also a Eureka client as it fetches the registry from Eureka server containing the details of other instances. In order to enable it, eureka.client.fetch-registry is set to true (by default, true). As soon as a service registers itself with the server, it fetches the registry and catches it. It keeps on checking the registry at regular interval (by default, 30 secs) and if there is any change in the registry, it fetches the update only and the unchanged part is still used from the cache.
-
Each Eureka instance uses a service endpoint, DiscoveryClient in order to get a list of all the ServiceInstance instances of the services registered on the registry. We can also see all the registered instances at http://localhost:5555/eureka/apps
Eureka with LoadBalancing
Now, suppose we have 2 instances running the Microservice2 and we want to make our requests load balanced. We will do it by using client-side load balancing.
1. Create a configuration file with a load-balanced bean of RestTemplate:
The @LoadBalanced annotation on the RestTemplate indicates that we want it to be load balanced.
import org.springframework.cloud.client.loadbalancer.LoadBalanced;
import org.springframework.context.annotation.Bean;
import org.springframework.context.annotation.Configuration;
import org.springframework.web.client.RestTemplate;

@Configuration
public class Micro1Config {
    @Bean
    @LoadBalanced
    public RestTemplate restTemplate()
    {
        return new RestTemplate();
    }
}
2. Modify Micro1Controller:
Here, Micro2 is the name of Microservice2, registered over the Eureka server.
import org.springframework.beans.factory.annotation.Autowired;
import org.springframework.web.bind.annotation.GetMapping;
import org.springframework.web.bind.annotation.RestController;
import org.springframework.web.client.RestTemplate;

@RestController
public class Micro1Controller {
   @Autowired
   RestTemplate restTemplate;

   @GetMapping("/getmicro2")
   public String getMicro2Instance()
   {
       String url = "http://Micro2/micro2/name";
       String micro2Respone = "Currently hitting instance running on port: "
                   + restTemplate.getForObject(url, String.class);
       return "micro1" + ":" + micro2Response;
   }
}
The response will be:
1. micro1 : micro2 8200
2. micro1 : micro2 8201
3. micro1 : micro2 8200
4. micro1 : micro2 8201
Conclusion
Service discovery forms the backbone of a robust and scalable microservices architecture, allowing services to dynamically locate and interact with one another. With the power of Eureka in Spring microservices, developers can effortlessly implement a seamless service discovery mechanism, ensuring efficient communication and coordination within their distributed systems.
By leveraging Eureka's features, such as registration, discovery, and load balancing, you can build resilient and responsive microservices applications.
So in this tutorial, we covered how we can use Eureka for Service discovery in a microservice architecture, with microservices created using Spring framework and setting up Eureka Server and Client. Hope you understood it, if you have any doubt, feel free to ask in the comment section below.
Freqnlty Asked Questions(FAQs)
1. What is service discovery in microservices?
Service discovery in microservices is the process of locating and connecting services within a distributed system. It enables services to dynamically discover and communicate with each other without hard-coded configurations, making it easier to scale, maintain, and deploy microservices applications.
2. What is Eureka in the context of Spring microservices?
Eureka is a service discovery framework developed by Netflix and widely adopted within the Spring microservices ecosystem. It provides a server-side component for service registration and a client-side component for service discovery, allowing microservices to register themselves and locate other services dynamically.
3. What are the benefits of using Eureka for service discovery in Spring microservices?
Eureka offers several benefits, including simplified service registration and discovery, automatic load balancing, failover support, and dynamic scaling. It provides a resilient and flexible solution for managing the communication and coordination between microservices in a distributed system.
4. How does Eureka handle service registration and discovery in Spring microservices?
In Spring microservices, Eureka works by having each microservice register itself with the Eureka server upon startup. The Eureka server maintains a registry of available services. Client microservices can then query the Eureka server to discover and locate the desired services, enabling seamless communication between them.
5. Can I use Eureka in conjunction with other technologies or frameworks?
Yes, Eureka can be used in conjunction with other technologies and frameworks commonly used in Spring microservices, such as Spring Cloud and Netflix Ribbon for client-side load balancing. Eureka integrates seamlessly with these tools to enhance the service discovery capabilities of your microservices architecture.
You may also like: